- The first problem is modifying your graphics to fit your new resolution. The my template used fixed width graphics. So first step is to download those images and resize them to your new width. If you goto your edit html option under Layout, you scroll down and find the background references. You only need modify the images that are used for backgrounds, not the icons, etc. The backgrounds may have variables in the names such as $startside in the template. In my template, there were for images to modify bottom_sash
- You can find those in the template, and find the URL that the image is pulled from such as http://www.blogblog.com/tictac_blue/bottom_sil.gif Normally you would just put that URL in a browser, see the image and right click to save it. But Google prevents you from doing this by preventing loads of those images except from their site. You can't do a 'view background' for the same reason. So what to do? You already have the images downloaded, just in your browser cache. So you must find them. Easiest way is if you are using Firefox, download the Cacheviewer extension for Firefox, and search for 'blogblog' and you'll find all your images. Right click each and 'save as'.
- Now you must modify the images to your new width. I did this by editing them in GIMP. One trick is to maintain the transparent spacing on the edge of the graphics. I just used the image sizes to my advantage to position stuff rather then counting pixels.
I first selected from the middle of the image all the way to the right edge, and did a copy. Then under the Image menu, expand the canvas size horizontally to your new width (1100px in my example) - be sure to uncheck the linked icon so you only change one dimension. Now, under Layer Menu, resize the current layer to canvas size. Then paste the clipboard into a new layer - move the new floating pasted layer all the way to the edge of the new sized image using the selection boundary as a guide, position and then anchor down the floating layer. Save the image. Repeat for each image. - Now you must upload the images to a website so your blog template can access them. http://www.photobucket.com is a site you can use that allows 'hotlinking' directly to photos. Create an account and upload the photos to the site. WARNING: Photobucket resizes your images when uploading, chose the resize to 1meg option so your image dimensions are not changed (like mine were! grr!)
- Now the last step is to edit the HTML template contents of your blog using the Layout->Edit HTML option in your blog's page. The template is a big style sheet which you can edit to your heart's content. If all you want to do is make the posting area wider, you must make the areas containing it wider. Find the elements that control the width on your page.
I started by just looking for the styles that defined a width. In my example, I was expanding from 847px to 1100px - a difference of 253. I found the width element of #content_wrapper and #outter_wrapper and added 253 to each value. I then added 253 to #main as well but when I previewed things, the sidebar was jacked. For some reason, I could not expand #main by the same amount I did the others, I experimented with values until I found 740px worked well.
How to experiment? A tip from our friend Axel suggests the Firefox extension Firebug. Firebug adds an 'inspect element' option when you right click on a page.. and you get a wonderful interface that allows you to view all aspects of your current page. Including modifying it and seeing the results!
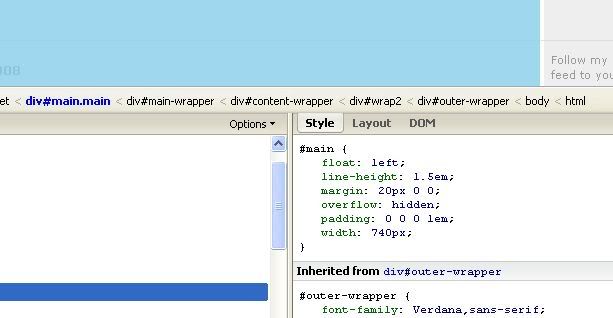
For blogger templates, the nesting can be quite complex. When you hover over an element in the panel at the bottom, the corresponding portion of the webpage is reflected. The one of interest in this scenario is the one controlling the post area - named #main
 Click on the image for a larger view
By clicking on the blue main text, you can see the style sheet for the area highlighted. Just click and edit the value for width on the stylesheet on the right and you can see your changes in real-time! I had problems doing this on the preview page from blogger, so just open a new browser window with your blog page to experiment.
Experiment and find the right value for you. For me it was 740px. Then go back to the Edit Template and change the width value for #main. Save your changes and check it out! Use firebug to help debug what sections are controlled by what styles by clicking the inspect text and hovering the mouse around the page.
bottom_sil
tile_
top_div_blue

No comments:
Post a Comment